Looking to add some bite-sized indulgence to your next gathering? Mini desserts offer a perfect way to enjoy a variety of sweet treats without the commitment of a full-sized dessert. These delightful creations are not only easy to serve but also bring a touch of elegance to any occasion.
With 25 delicious mini dessert recipes, you’ll find something for every taste and preference. Whether you’re hosting a party, planning a brunch, or simply craving a small treat, these mini desserts are sure to impress your guests and satisfy your sweet tooth.
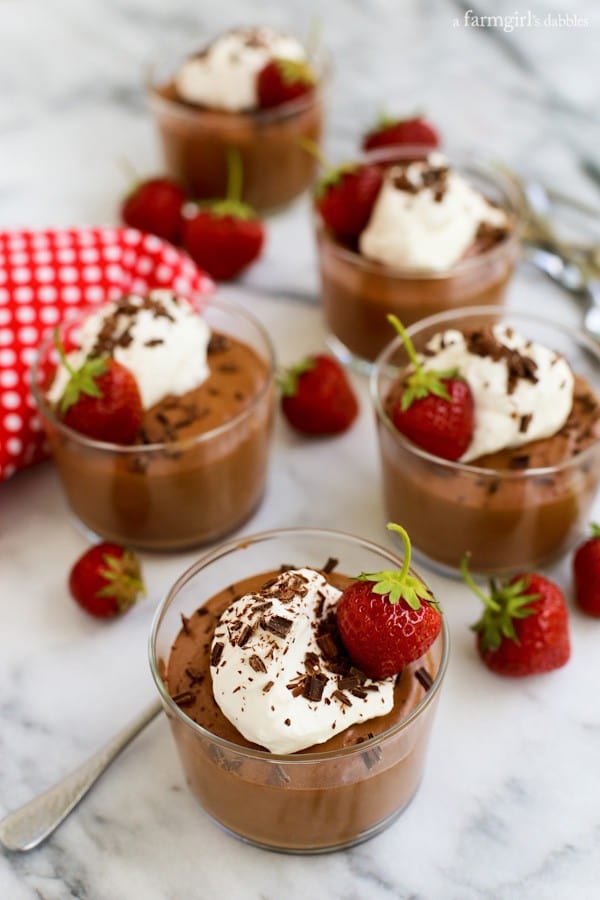
1) Chocolate Mousse Cups
Chocolate Mousse Cups are a simple yet elegant dessert perfect for any occasion. To begin, you need to mix cocoa powder and pudding mix together. Next, add heavy cream and beat this mixture with an electric mixer for about a minute until it thickens.
Once your mousse mixture is ready, prepare your serving cups. Start by adding a tablespoon of Oreo crumbs to the bottom of each cup. Then, spoon or pipe a layer of chocolate mousse on top of the crumbs. Repeat the layers until you fill the cups.
After layering, cover each cup with plastic wrap. Place the cups in the refrigerator to set for at least 2 hours. When ready, top them with whipped cream and a sprinkle of chocolate shavings for a decorative touch.
These Chocolate Mousse Cups can be prepared in advance and stored in the refrigerator for 1-2 days, making them a perfect make-ahead dessert. Avoid freezing them to maintain their creamy texture. Enjoy the rich and smooth taste of these delightful treats!
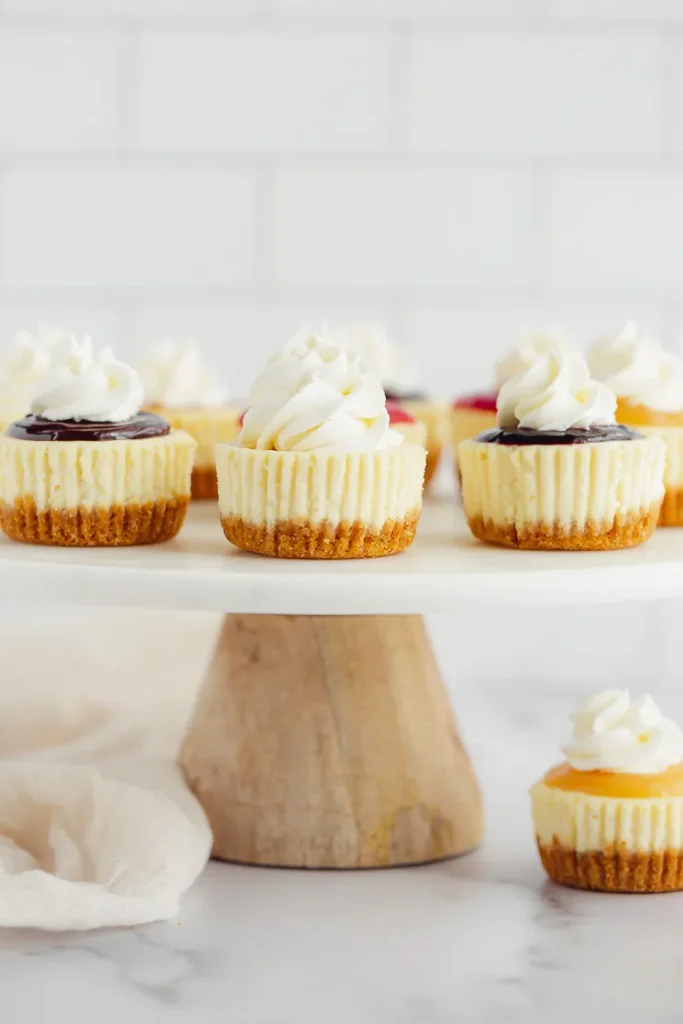
2) Mini Cheesecakes
Mini cheesecakes are delightful bite-sized treats perfect for parties and gatherings. They are easy to make and offer a deliciously creamy and rich texture that everyone will love.
To start, you can use a variety of crusts like graham crackers, Oreos, or digestive biscuits. Crush them until they are fine crumbs and mix with melted butter to form the base.
Next, you prepare the cheesecakes filling. Combine cream cheese, sugar, eggs, and vanilla extract to create a smooth and creamy mixture. Pour this filling onto the prepared crusts in muffin tins.
You can add different toppings to make each mini cheesecake unique. Some popular options include fresh berries, chocolate ganache, caramel, or even crushed candies.
Mini cheesecakes are usually baked in standard muffin pans lined with paper liners. This makes them easy to remove and serve. They are ready when the edges are set, but the centers should still have a slight jiggle.
These tiny desserts are versatile. You can make them in various flavors, such as strawberry, pumpkin, or chocolate. Experiment with different combinations to find your favorites.
Serve mini cheesecakes chilled. They are a great make-ahead dessert, allowing you to focus on other preparations when hosting. Enjoy these mini delights at your next event!
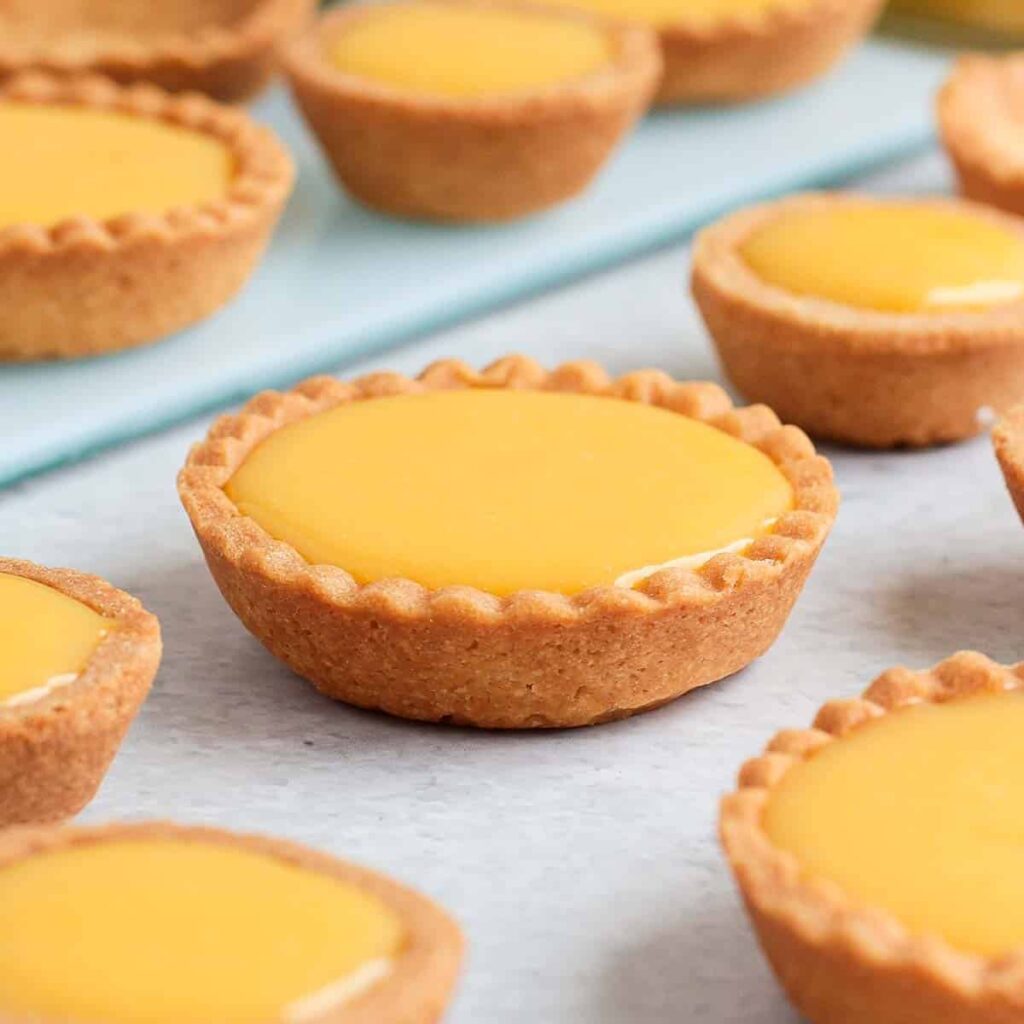
3) Lemon Curd Tarts
Lemon curd tarts are a delightful treat perfect for any occasion. They combine a tangy lemon filling with a crisp, buttery crust, creating a harmonious blend of flavors.
To make these tarts, start with a shortbread or phyllo crust. Preheat your oven to either 300°F or 350°F depending on your choice of recipe. Bake the crusts until they turn a light golden brown.
Once the crusts are cool, fill each tart shell with smooth lemon curd. You can make the curd yourself or use store-bought for convenience. A common amount is about one tablespoon per tart.
Top your lemon tarts with fresh berries or a dollop of whipped cream for an extra touch. This adds both color and a burst of extra flavor.
Refrigerate the filled tarts until you are ready to serve them. They are best enjoyed chilled, making them a refreshing dessert option on warm days.
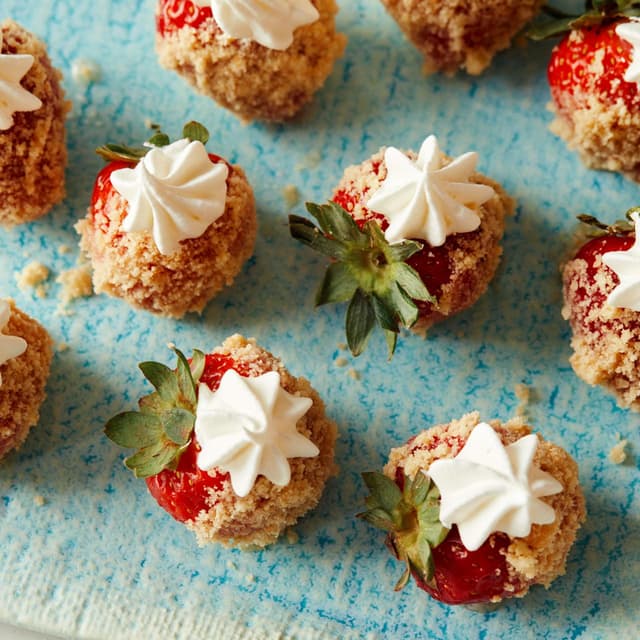
4) Strawberry Shortcake Bites
Strawberry Shortcake Bites are a perfect mini dessert. They’re easy to make and delicious. To start, you will need a pound cake, fresh strawberries, and whipped cream.
First, cut the pound cake into small shapes using a cookie cutter. Make sure the pieces are roughly bite-sized. Next, prepare your strawberries by slicing them and poking small holes in each one. This will help them stay on top of the whipped cream.
Use a piping bag with a star tip to add a dollop of whipped cream on each pound cake piece. Then, place a sliced strawberry on top of the cream. The small hole in the strawberry should help keep it secure.
These bites are great for parties or gatherings. They are simple but elegant. You can also add a dusting of powdered sugar for an extra touch. Enjoy your Strawberry Shortcake Bites!
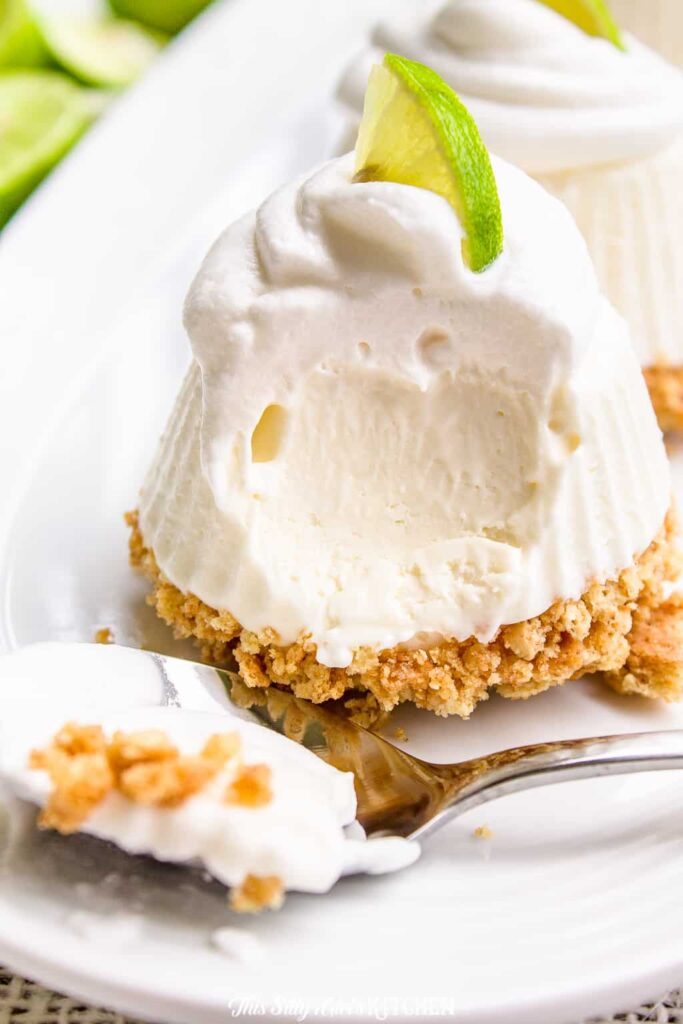
5) Mini Key Lime Pies
Mini Key Lime Pies are a delightful treat, perfect for any occasion. They combine a tangy, creamy filling with a crunchy crust, creating a bite-sized dessert that is sure to impress.
To make the crust, mix graham cracker crumbs, melted butter, and a bit of sugar. Press this mixture firmly into your muffin tin or mini pie molds.
For the filling, whisk together sweetened condensed milk, Key lime juice, sour cream, and lime zest. Pour this mixture into the prepared crusts, filling them to the top.
Bake these little pies at 350°F for about 5-8 minutes until they’re just set. Allow them to cool completely on a rack, then refrigerate for at least an hour.
Top each mini pie with a dollop of whipped cream, a sprinkle of lime zest, and a small slice of lime if you like. These tiny desserts offer a refreshing burst of flavor and are easy to serve at parties.
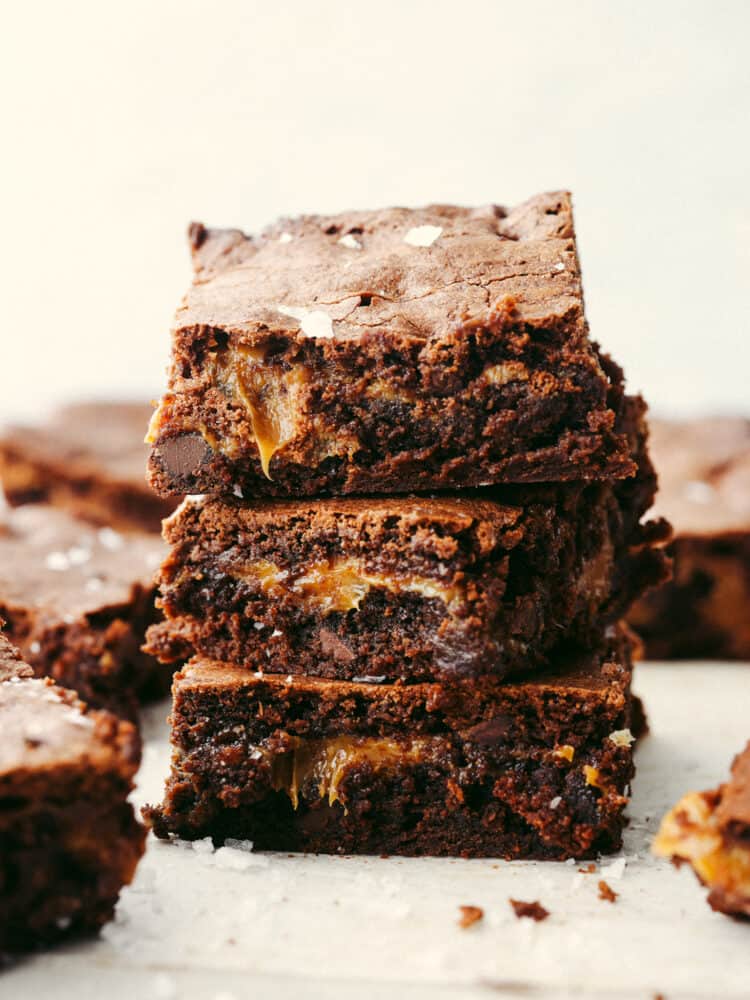
6) Salted Caramel Brownies
Salted caramel brownies combine rich chocolate with a touch of salty sweetness.
To make these at home, you start with a basic brownie mix or a homemade batter.
Preheat your oven to 350°F (175°C). Prepare a baking dish by greasing or lining it with parchment paper.
Pour half the brownie batter into the dish and smooth it out. Drizzle caramel sauce over the batter. Then, add the rest of the brownie batter on top.
You can swirl the caramel through the batter using a knife. This creates a marbled effect. Bake for about 35-40 minutes. Check if they’re done by inserting a toothpick into the center. It should come out mostly clean.
Once baked, sprinkle coarse sea salt over the top. Let the brownies cool completely before cutting.
These salted caramel brownies are perfect for parties or a sweet treat at home.
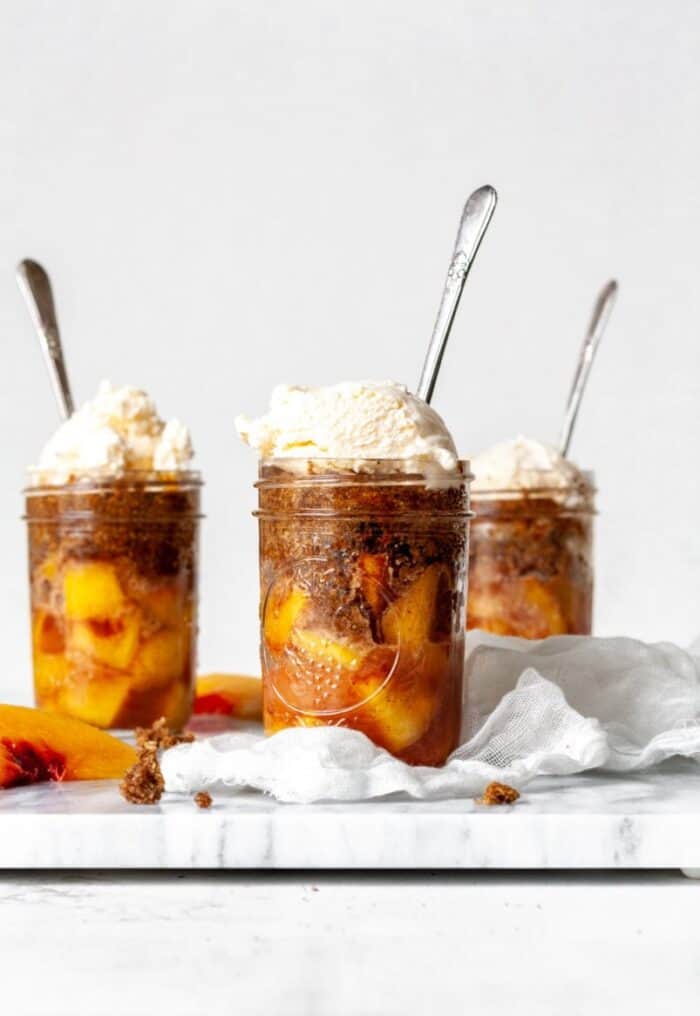
7) Peach Cobbler Jars
Peach cobbler jars are a delightful treat. They let you enjoy the flavors of a cobbler in a personal size. Perfect for parties or a simple dessert at home.
First, preheat your oven to 350°F. Prepare 6 to 8 mason jars by spraying them with cooking spray. This will prevent the cobbler from sticking.
Mix sliced peaches with a bit of lemon juice and sugar. You can also add blueberries if you like. Fill each jar halfway with this fruit mixture.
In another bowl, blend room temperature butter, sugar, and flour until it resembles coarse crumbles. This is your topping. Spoon the topping over the fruit in each jar.
Place the jars in a baking pan and bake for about 20-25 minutes. The topping should be golden brown, and the fruit tender.
Let the jars cool a bit before serving. You can enjoy them as is or with a scoop of vanilla ice cream. Peach cobbler jars are easy to make and customize with your favorite fruits.

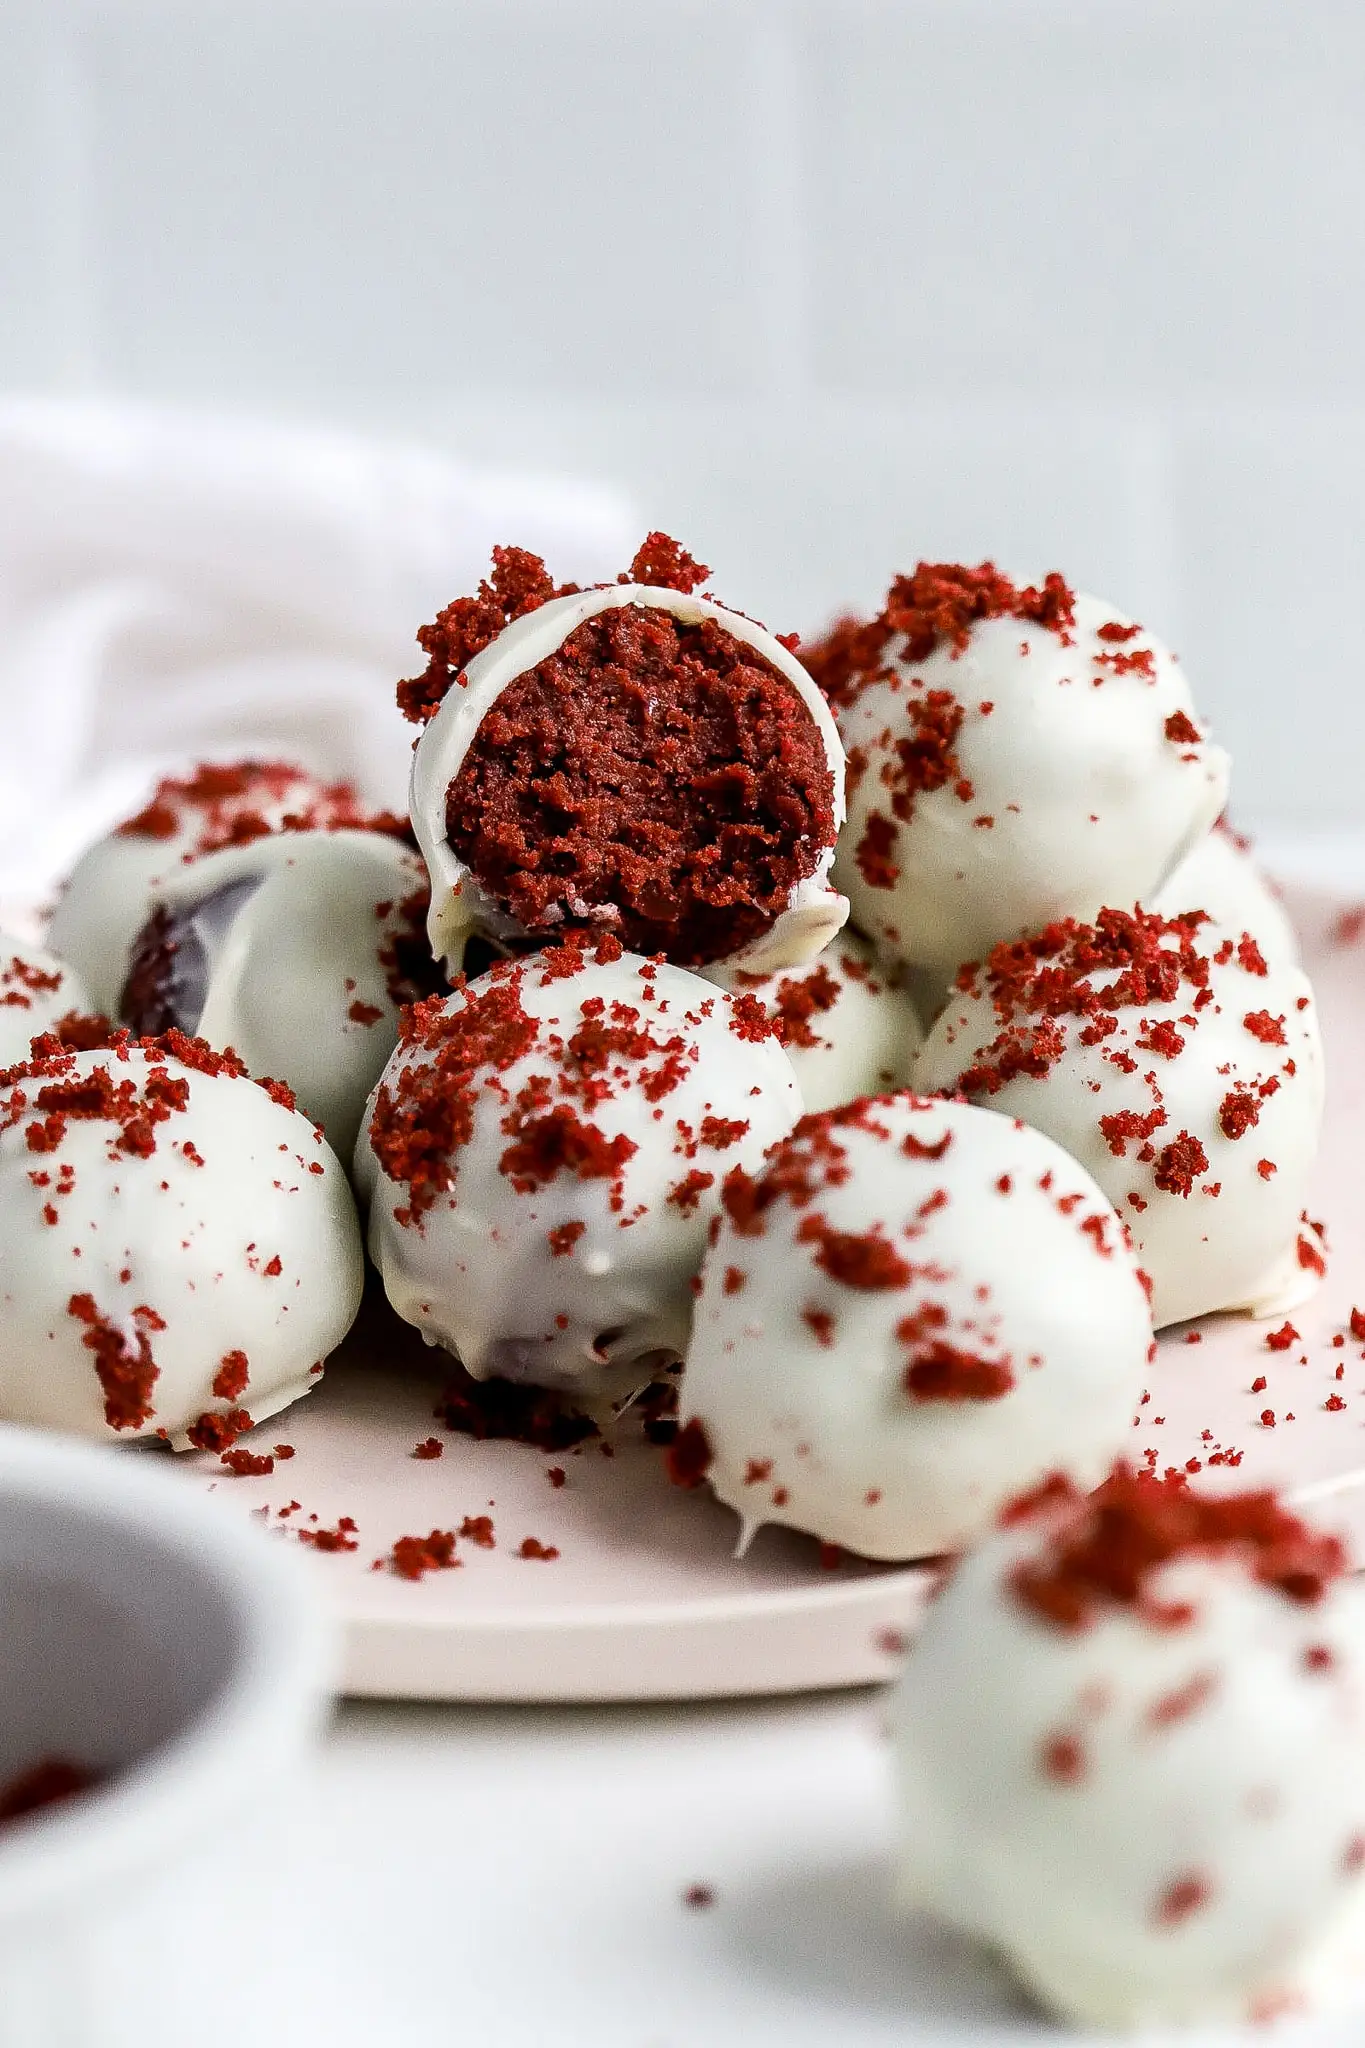
8) Red Velvet Cake Balls
Red Velvet Cake Balls are a delightful treat that are both fun to make and delicious to eat.
Start by preheating your oven to 350°F. Prepare a red velvet cake mix according to the directions on the box. Once baked, allow the cake to cool completely.
After the cake is cooled, crumble it into fine pieces. In a separate bowl, mix together cream cheese and sugar until smooth. Combine the cake crumbles with the cream cheese mixture.
Form the mixture into small balls, about the size of a tablespoon. Place them on a baking sheet lined with parchment paper and chill them in the refrigerator for at least an hour.
Melt some chocolate in the microwave or on the stove. Dip each cake ball into the melted chocolate, ensuring it’s fully coated. Place the dipped balls back on the parchment paper.
If you want, you can drizzle extra chocolate or add sprinkles on top of the cake balls. Let the chocolate set in the refrigerator before serving.
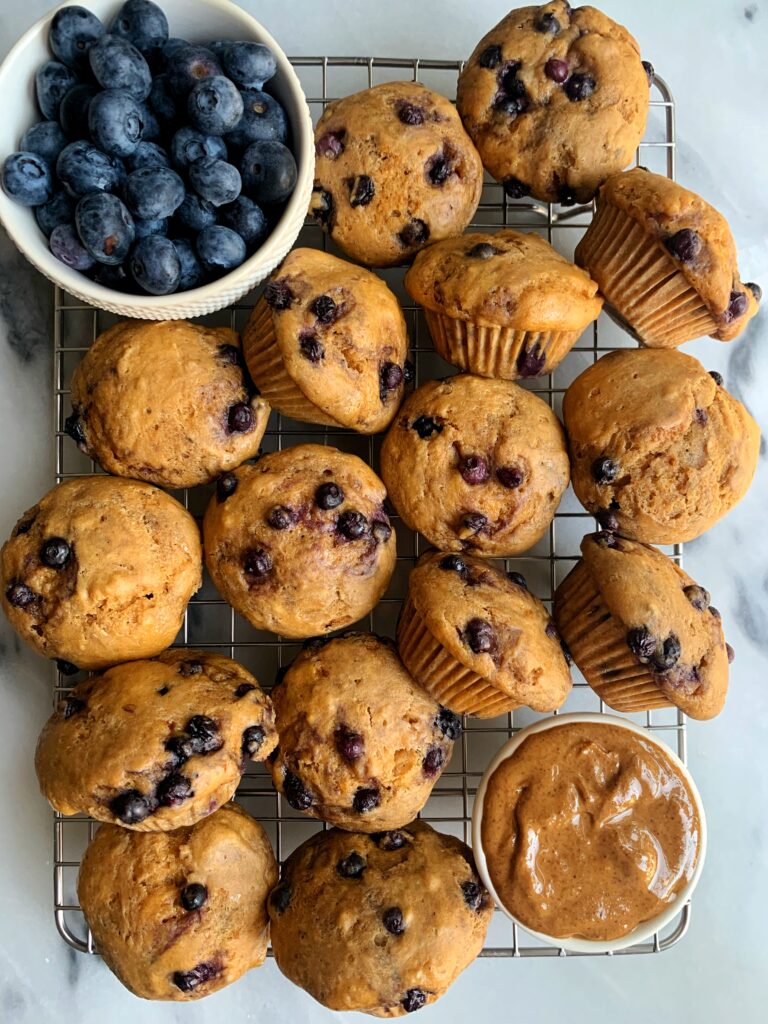
9) Blueberry Muffin Bites
Blueberry Muffin Bites are perfect for a quick snack or a delicious breakfast treat. They are easy to make and full of flavor.
To start, preheat your oven to 375°F and prepare your mini muffin pan with nonstick spray or paper liners. In a large bowl, mix together flour, baking powder, and salt.
In another bowl, beat together butter and sugar until creamy. Add an egg and vanilla extract, then mix well. Pour in milk and continue to beat until combined. Gradually add the dry ingredients to the wet mixture, stirring until everything is just combined.
Gently fold in fresh or frozen blueberries. Be careful not to over-mix, as this can make the muffins dense. Use a small cookie scoop or tablespoon to fill the mini muffin cups about three-quarters full.
Bake for about 15 minutes or until a toothpick inserted into the center comes out clean. Let the muffins cool in the pan for a few minutes before transferring them to a wire rack to cool completely.
These bites are moist, tender, and bursting with blueberry goodness. You can store them in an airtight container for a few days or freeze them for longer storage.
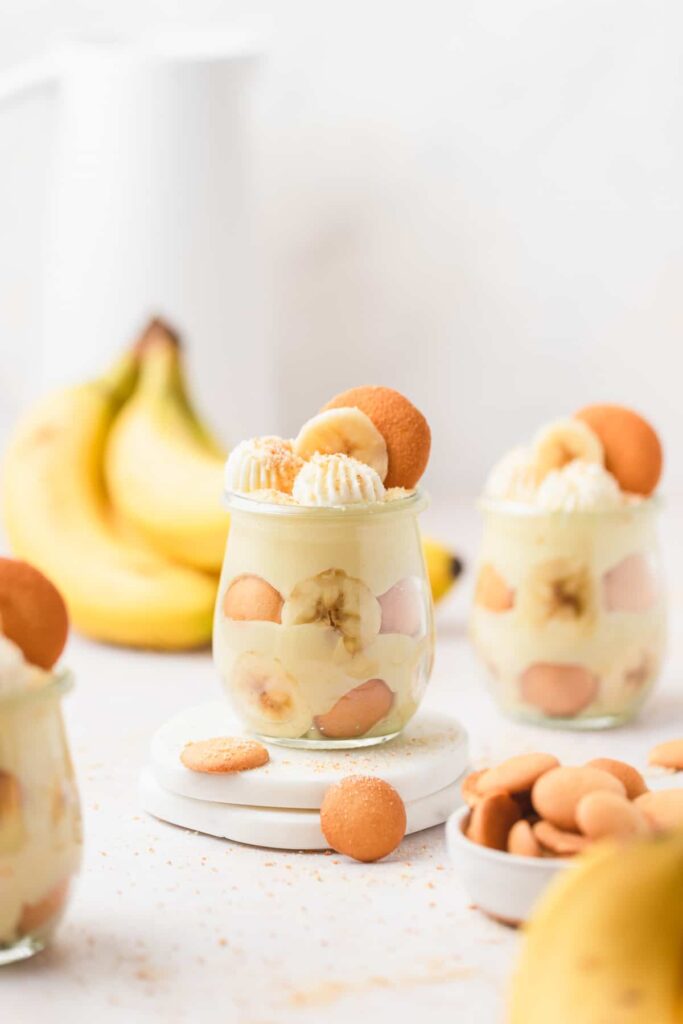
10) Banana Pudding Cups
Banana pudding cups are a delightful treat that you can easily make at home. They are perfect for parties or any time you crave something sweet and creamy.
Start by preparing vanilla pudding according to the package directions. Mix the pudding with some whipped topping for a fluffy texture.
Use clear cups or jars to layer your ingredients. Begin with a layer of crushed cookies or wafers.
Add a layer of banana slices on top of the cookies. Then, spoon in a layer of the pudding mixture. Cover the bananas completely to prevent them from browning.
Repeat these layers until you fill the cup. Finish with a dollop of whipped topping and a couple of cookie crumbs or a whole wafer on top for decoration.
Refrigerate the cups for at least 2 hours before serving. This allows the flavors to blend and the pudding to set.
Serve chilled and enjoy your delicious banana pudding cups!
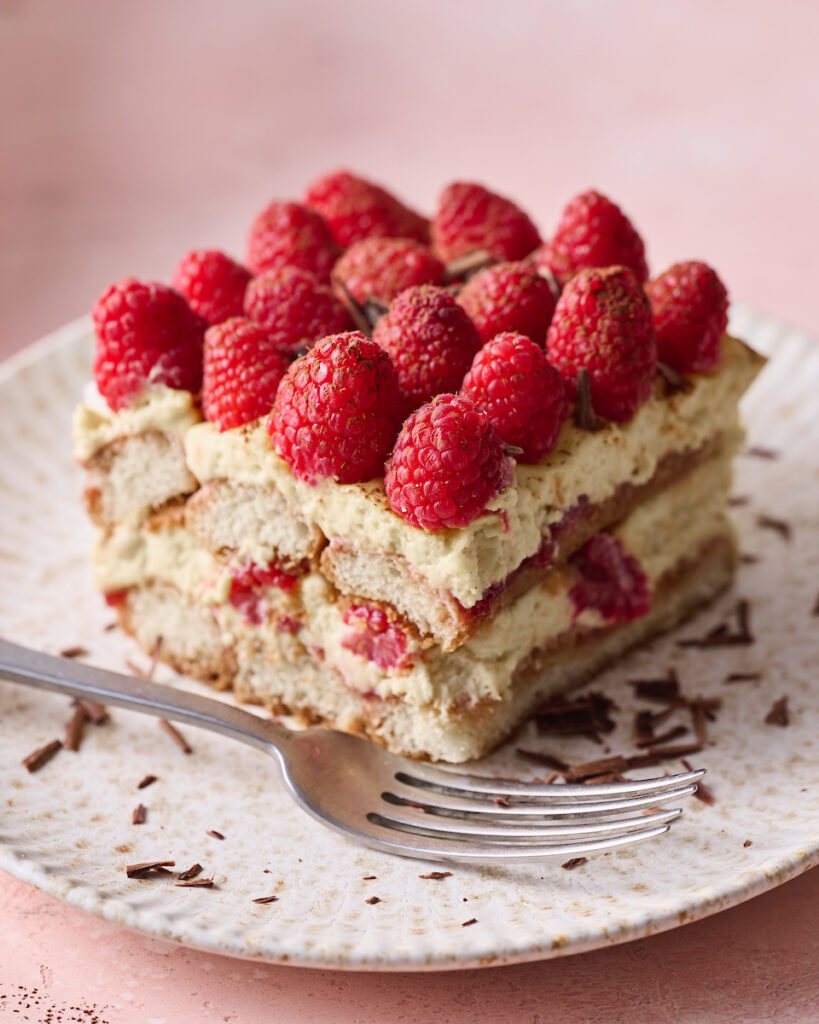
11) Raspberry Tiramisu
Raspberry Tiramisu combines the classic Italian dessert with the vibrant flavor of raspberries. To make this, start by preparing a raspberry syrup. Heat raspberries, sugar, and lemon juice in a saucepan until it bubbles, then reduce to a simmer.
Next, make the mascarpone mixture. Beat egg yolks and sugar over a double boiler until pale yellow. Remove from heat and continue mixing until the sugar dissolves. Add mascarpone cheese and blend until smooth.
In a separate bowl, whip heavy cream with sugar until stiff peaks form. Gently fold the whipped cream into the mascarpone mixture. Divide this cream into two parts. Add raspberry syrup to one part, folding it in gently.
To assemble, dip ladyfingers into raspberry liqueur and layer them in a dish. Spread the mascarpone mixture over the ladyfingers, followed by the raspberry cream. Repeat layers, ending with the cream on top.
Chill the assembled tiramisu in the refrigerator for a few hours. Before serving, garnish with fresh raspberries for a beautiful finish. Your guests will love the combination of creamy layers and fresh raspberry flavor.
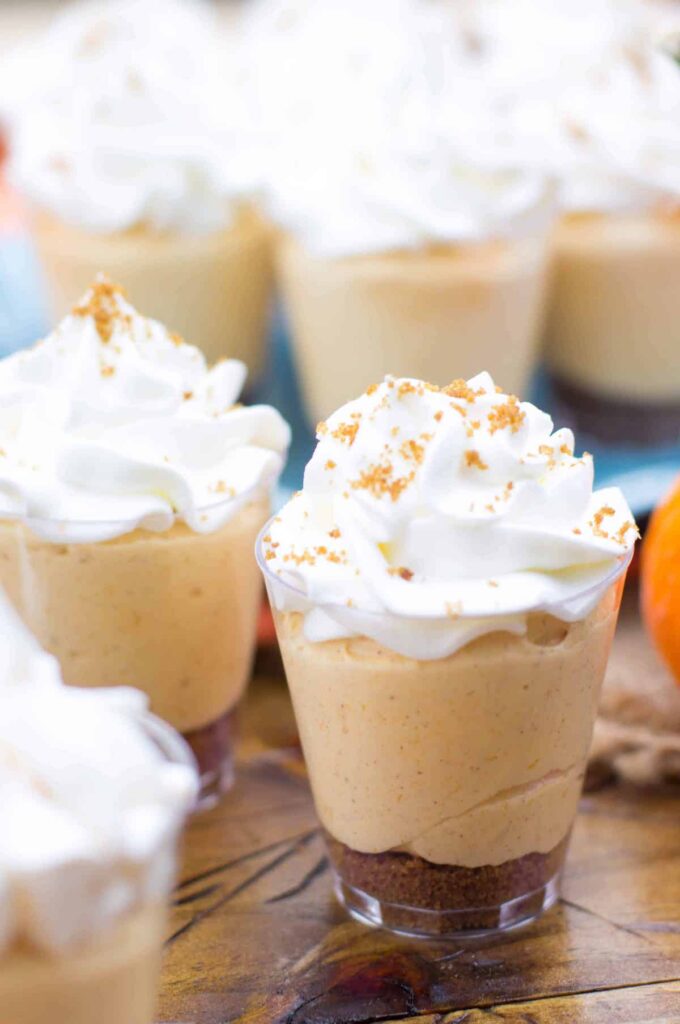
12) Pumpkin Pie Shooters
Pumpkin Pie Shooters are a delightful mini dessert perfect for fall. They capture the essence of pumpkin pie in a small, easy-to-eat form.
Start with a base of gingersnap cookie crumbs, which adds a crunchy texture. Next, layer in a creamy pumpkin pie filling. You can make this layer using canned pumpkin, cream cheese, and spices like cinnamon and nutmeg.
Add a bit of whipped cream on top for a light and fluffy texture. This layer balances the rich pumpkin filling. For an extra touch, you can sprinkle some crushed pecans or a dusting of cinnamon on the whipped cream.
These shooters are simple to prepare. They require no baking, making them a quick option for any gathering. Serve them in small shooter glasses for a stylish presentation.
You can also try different variations. For example, use a graham cracker crust instead of gingersnaps or add a dollop of caramel sauce between the layers.
Pumpkin Pie Shooters are versatile and always a hit. They are a great way to offer a taste of pumpkin pie without the need to cut and serve a whole pie.
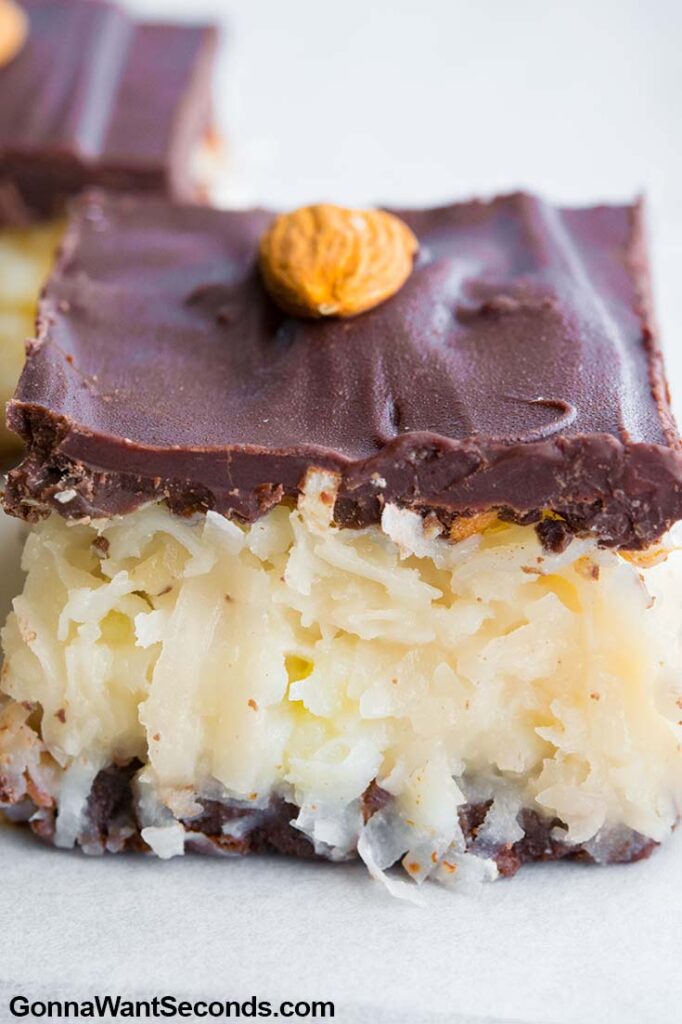
13) Almond Joy Bars
Almond Joy Bars are a delicious treat perfect for any occasion. Combining the flavors of chocolate, coconut, and almonds, these bars are sure to be a hit.
To start, preheat your oven to 350°F. A baking dish lined with aluminum foil and nonstick spray will make clean-up easy. Melt one cup of butter in the microwave.
In a large bowl, mix the melted butter with one cup of sugar and half a teaspoon of salt. Add flour and blend until the mixture is crumbly. This will form the base of your bars.
Next, press the mixture into the prepared baking dish to form an even layer. Bake for about 5-6 minutes. While the crust is baking, prepare the filling.
Mix shredded coconut, almond meal, and sliced almonds until the mixture forms a ball. Spread this evenly over the baked crust. For the chocolate topping, melt dark chocolate chips with a tablespoon of coconut oil, then drizzle over the top.
Let the bars cool before cutting them into mini squares. They are now ready to serve and enjoy! These bars are a delightful blend of textures and flavors that everyone will love.
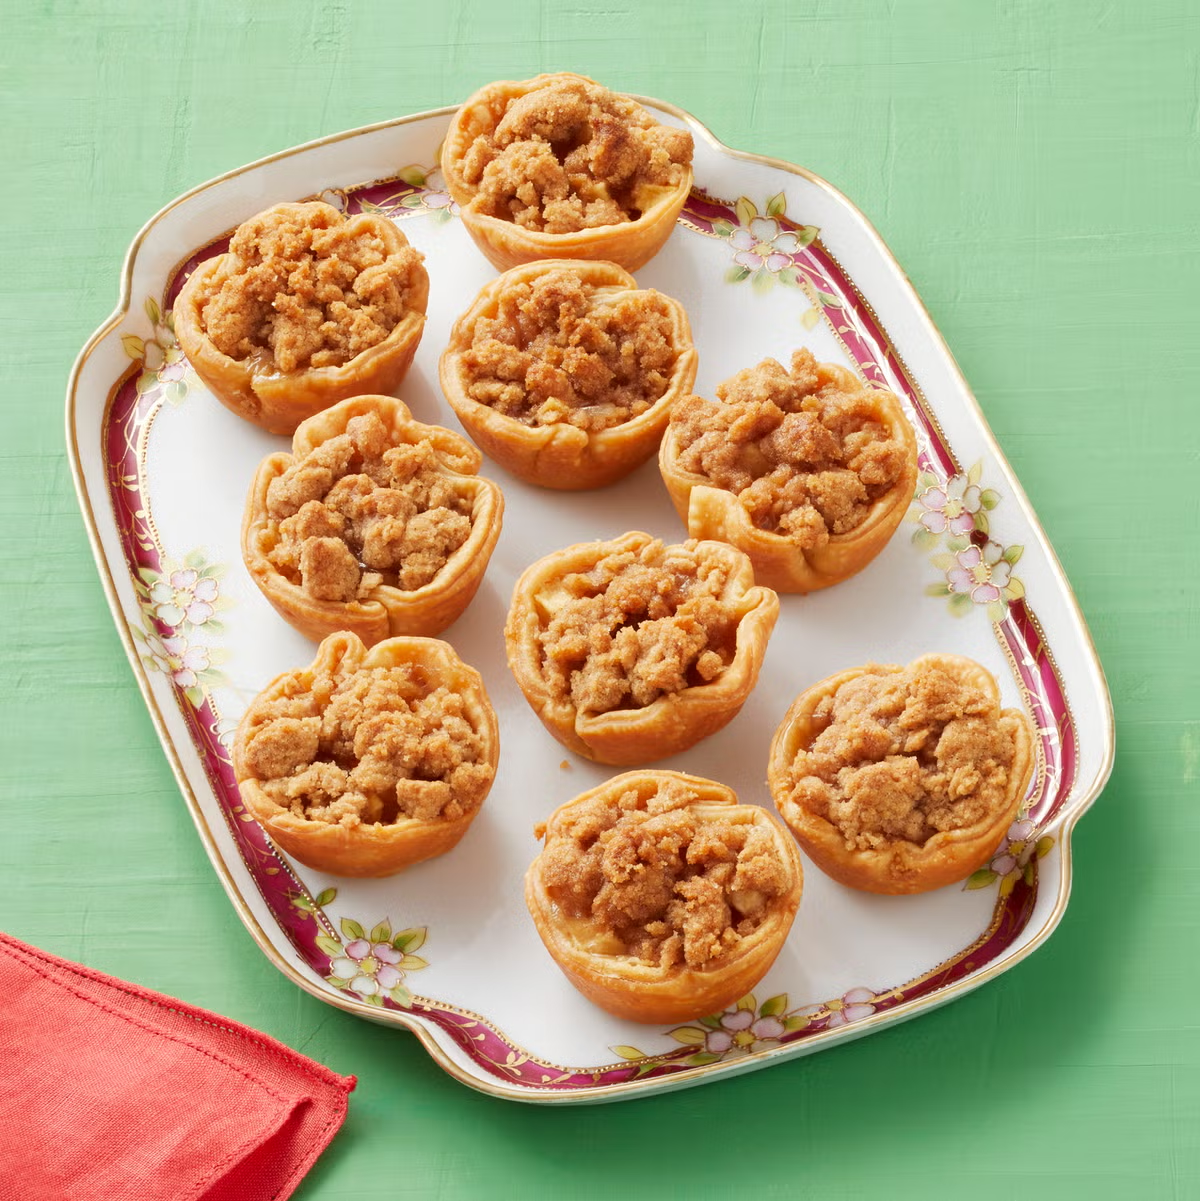
14) Mini Apple Pies
Mini apple pies are a delightful treat that captures all the flavors of a classic apple pie in a small, portable size.
First, gather your ingredients. You need pie dough, apples, sugar, cinnamon, allspice, and an egg. Preheat your oven to 375°F (190°C).
Roll out the pie dough to about 1/8-inch thickness on a floured surface. Use a round cutter to make circles of dough. Press each circle into a muffin tin, ensuring the dough reaches up the sides.
To make the filling, dice your apples and mix them with sugar, cinnamon, and a pinch of allspice. Fill each dough-lined muffin cup with this apple mixture.
Prepare an egg wash by whisking an egg with a little water. Brush the edges of the dough with the egg wash. If desired, you can add a lattice top or decorative cut-outs over each pie.
Bake the mini pies for around 20-25 minutes until the crust is golden brown. Let them cool in the tin before removing.
Serve your mini apple pies warm or at room temperature. These mini desserts are perfect for parties, picnics, or a sweet snack anytime.
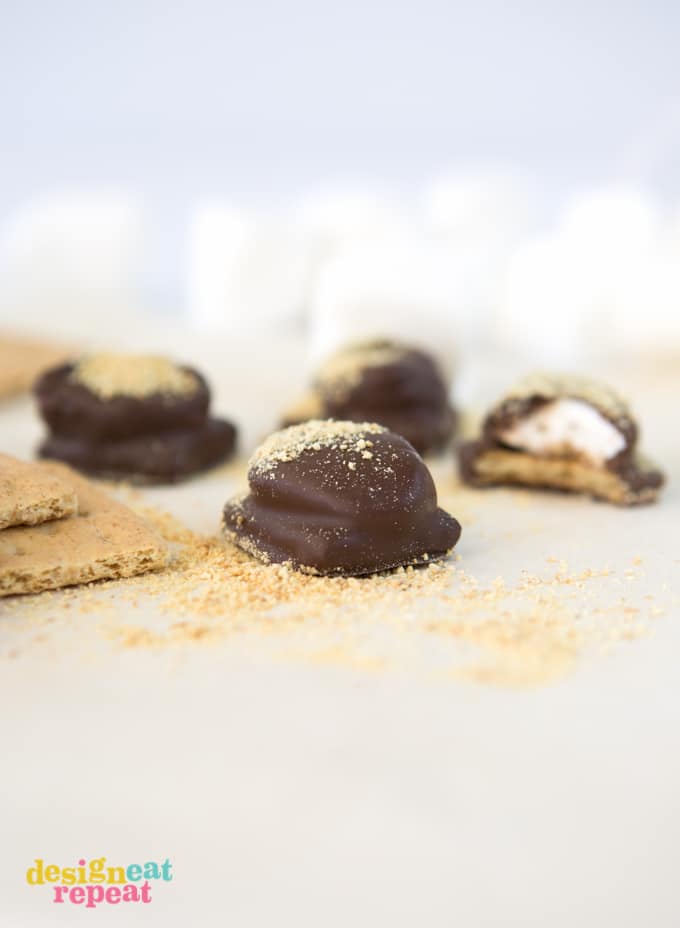
15) S’mores Bites
S’mores bites bring the classic campfire treat to your kitchen in a simple and delicious way. They are easy to make and perfect for any occasion, requiring just a few basic ingredients.
First, preheat your oven to 350 degrees F. Crush graham crackers into fine crumbs by placing them in a large Ziploc bag and rolling over them with a rolling pin.
Next, mix the graham cracker crumbs with powdered sugar and melted butter in a small bowl. Press this mixture into the bottom of a mini muffin tin to form the crust.
Once the crust is ready, place a piece of chocolate and half a marshmallow into each cup. Bake for a few minutes until the marshmallows get soft and slightly golden.
If you want a more toasted top, turn on the broiler for a minute or two. Watch closely to prevent burning.
You can enjoy these s’mores bites warm or at room temperature. They are perfect for a quick treat or a fun party snack that kids and adults will love.
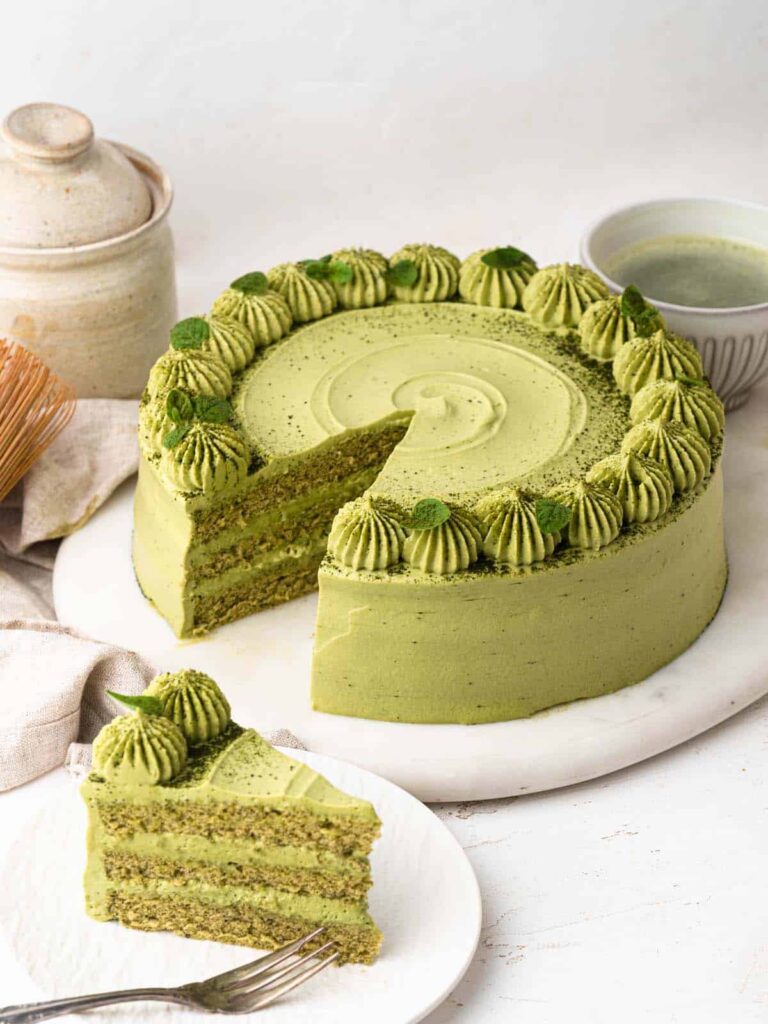
16) Matcha Green Tea Cakes
Matcha green tea cakes bring the unique, earthy flavor of matcha to a delightful dessert. These cakes are moist, flavorful, and have a beautiful green hue from the matcha powder.
To start, preheat your oven to 325°F and line your baking pan with parchment paper. This ensures your cakes come out easily without sticking.
In a bowl, mix softened butter and sugar using an electric mixer until light and fluffy. This usually takes about one to two minutes.
Next, add the matcha powder to your mixture. Make sure to sift the powder to avoid any lumps. Adding eggs one at a time, beat well after each addition.
Slowly fold in your flour and a pinch of salt, mixing until just combined. Do not overmix, as this can make the cakes dense.
Pour the batter into your prepared pan and bake for about 20-25 minutes. You’ll know they are done when a toothpick inserted into the center comes out clean.
Once baked, let the cakes cool completely before removing them from the pan. You can serve them as they are or with a dusting of powdered sugar or a light glaze for added sweetness.
Enjoy your matcha green tea cakes with a cup of tea for a delightful treat!
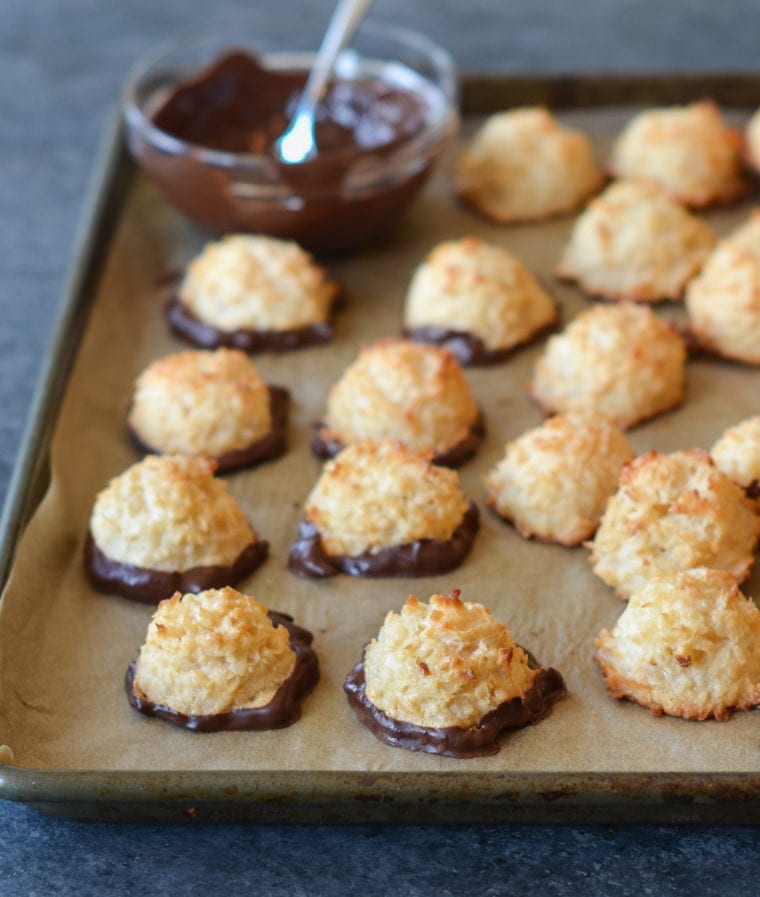
17) Coconut Macaroons
Coconut macaroons are delightful, bite-sized sweets that are easy to make. You start by preheating your oven to 325°F. This ensures they bake evenly.
Gather your ingredients: coconut flakes, sweetened condensed milk, vanilla extract, egg whites, and a pinch of salt. Mix the coconut, condensed milk, and vanilla in a large bowl.
In a separate bowl, beat the egg whites with salt until you get stiff peaks. This adds fluffiness to your macaroons.
Gently fold the egg whites into the coconut mixture. Use a teaspoon to portion out the mixture onto a baking sheet lined with parchment paper.
Bake on the middle oven rack to ensure even cooking. They should be golden brown around the edges. Cool completely before serving.
Coconut macaroons are both chewy and crispy, making them a perfect mini dessert for any occasion. Enjoy!

18) Nutella Stuffed Doughnuts
Nutella stuffed doughnuts are a delightful treat that combines the richness of Nutella with the soft, fluffy texture of doughnuts. Start with a basic doughnut dough. Mix flour, sugar, yeast, and a bit of salt. Add wet ingredients like butter, eggs, and milk.
You need to let the dough rise until it doubles in size. This usually takes about two hours. After it has risen, roll the dough out to about half an inch thick. Use a round cutter to cut out circles.
Heat oil in a deep fryer or a heavy skillet to 350 degrees F. Fry the doughnut circles in batches for about 2-3 minutes, or until they are golden brown. Use a spider strainer to remove the doughnuts and let the excess oil drip off.
Once cool, use a piping bag to fill each doughnut with Nutella. Roll the stuffed doughnuts in a mixture of cinnamon and sugar for an extra layer of flavor. Serve these delicious treats while they are still warm, and enjoy the gooey Nutella center.
19) Mini Cannoli
Mini cannoli are a delightful dessert that brings Italian flavors to your table. They start with small, crispy shells filled with a creamy mixture.
You can prepare the shells by dipping their ends in melted chocolate. This adds a delicious touch and a bit of extra crunch.
For the filling, blend ricotta cheese with powdered sugar until smooth. Add in chocolate chips and some zest for extra flavor. Orange or lemon zest both work well.
Spoon the filling into a ziplock bag. Cut off one corner of the bag to easily pipe the filling into the shells. Once filled, chill them in the fridge before serving.
Sprinkle powdered sugar on top just before serving. This adds a sweet finishing touch.
These mini cannoli are perfect for parties. They are easy to make and even easier to eat.
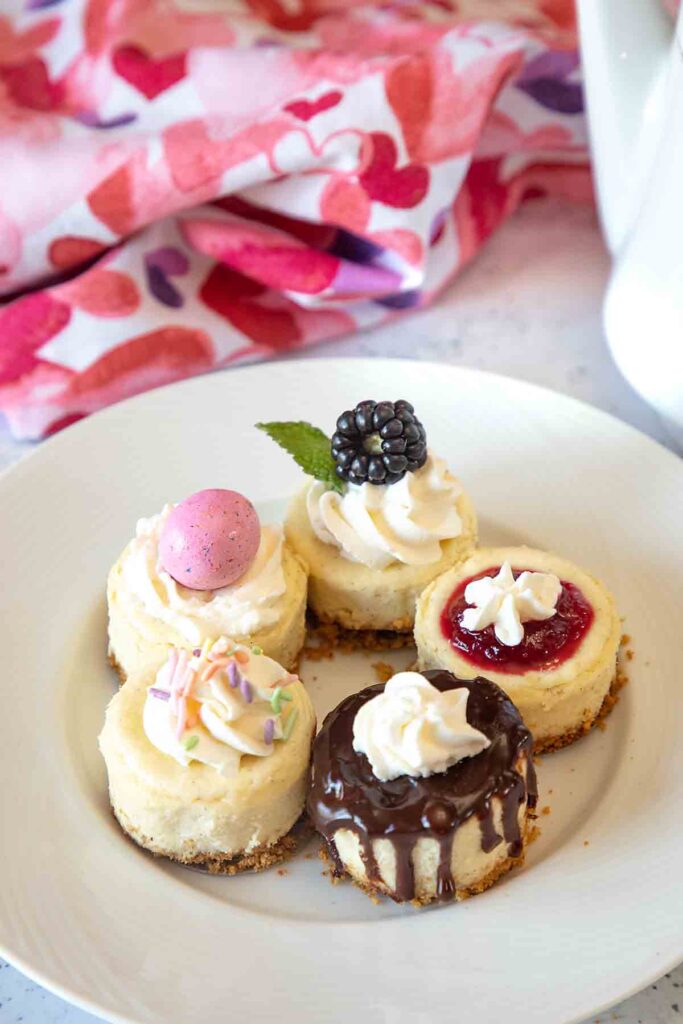
20) Lavender Cheesecake Bites
Lavender Cheesecake Bites are a delightful treat that’s perfect for any occasion. You’ll enjoy the blend of creamy cheesecake with a hint of lavender.
Start by preheating your oven to 325°F. Line a cupcake pan with cupcake liners. For the crust, mix graham cracker crumbs with melted butter and a bit of sugar. Press this mixture into the bottom of each liner.
Next, prepare the cheesecake filling. In a large bowl, combine cream cheese, sugar, and a touch of flour. Mix until smooth. Add sour cream, lavender extract, and vanilla extract.
Scoop spoonfuls of this filling into the prepared crusts. Bake for about 20 minutes or until the centers are set. Let them cool completely before serving.
For added decoration, you can top each cheesecake bite with whipped cream and a fresh blackberry. These little desserts are sure to impress your guests with their unique flavor and elegant appearance.
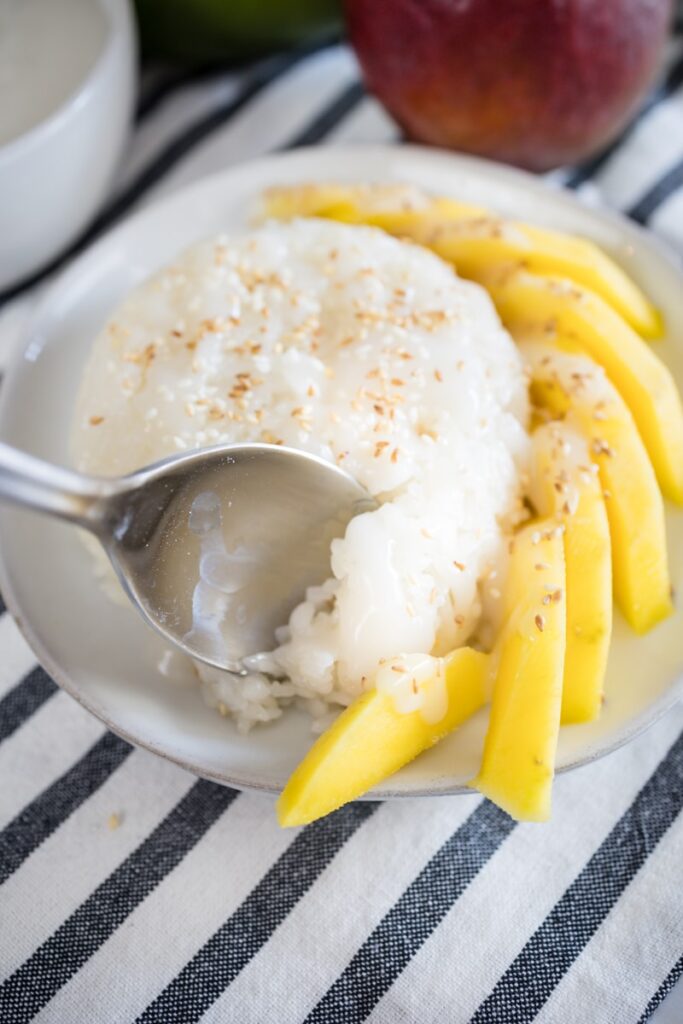
21) Mango Sticky Rice Bites
Mango Sticky Rice Bites are a delightful twist on the traditional Thai dessert. This recipe is perfect for bite-sized treats that are easy to share.
First, prepare the sticky rice by soaking it in water for at least 30 minutes. If you have time, let it soak overnight for the best texture.
Next, steam the soaked rice until it’s fully cooked. This usually takes about 15 minutes. Set the rice aside while you make the sweet coconut sauce.
In a small pot, combine coconut milk, sugar, and a pinch of salt. Cook over medium heat, stirring constantly, until the sugar dissolves and the mixture thickens.
Mix a portion of the coconut sauce into the cooked sticky rice. Let it sit for about 30 minutes so the flavors absorb well.
To assemble, shape small portions of the sticky rice mixture into bite-sized balls or mounds. Slice ripe mangoes into thin pieces.
Place a piece of mango on each sticky rice bite. For an extra touch, drizzle a bit of the remaining coconut sauce over the top.
You can garnish with toasted sesame seeds or mung beans for added texture. These Mango Sticky Rice Bites are ready to serve and sure to impress your guests.
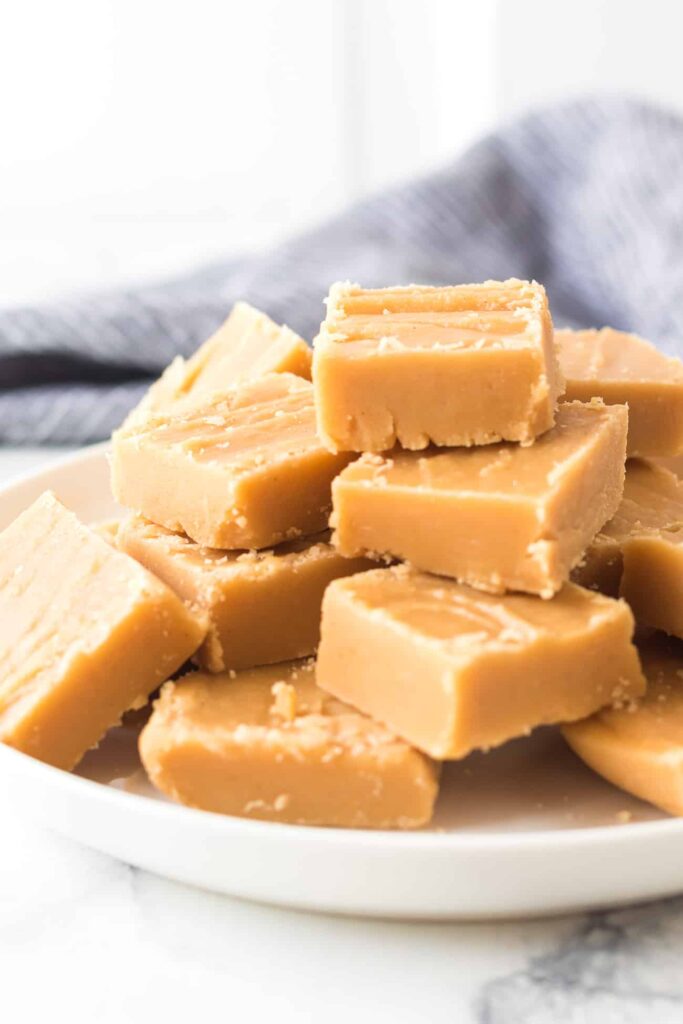
22) Peanut Butter Fudge
Peanut butter fudge is a delightful and simple dessert mini treat. This rich and creamy fudge captures the essence of peanut butter in every bite.
To make peanut butter fudge, you’ll need basic ingredients like butter, peanut butter, and vanilla extract. Start by melting butter over medium-low heat in a saucepan. Then, stir in the peanut butter until it’s smooth.
Next, remove the pan from heat and add vanilla extract. Stir well to incorporate the vanilla, giving the fudge a wonderful aroma and taste. Pour the mixture into a dish lined with parchment paper.
For an even smoother texture, some recipes suggest mixing the peanut butter and hot butter mixture with powdered sugar. This gives the fudge a sweet, melt-in-your-mouth quality.
Once your mixture is spread evenly in the dish, let it cool at room temperature. Then, place it in the fridge to chill overnight.
Cut the chilled fudge into small 1-inch squares. This size is perfect for a quick snack-sized dessert. Store the pieces in an airtight container, keeping them fresh for up to a week at room temperature or up to three weeks in the fridge.

23) Funfetti Cookie Sandwiches
Funfetti cookie sandwiches are colorful and delicious treats. They’re great for parties or just a fun dessert at home.
Start by preheating your oven to 350°F (175°C) and lining a baking sheet with parchment paper.
In a large bowl, combine Funfetti cake mix, eggs, and vegetable oil. Mix until smooth.
Use a cookie scoop to form dough balls. Place them on the baking sheet and flatten slightly.
Bake the cookies for 8-10 minutes or until they are set. Let them cool on a wire rack.
For the filling, you can use store-bought frosting or make your own. Simply spread the frosting on the bottom of one cookie and sandwich it with another.
Add more sprinkles to the edges for extra fun.
Enjoy your homemade Funfetti cookie sandwiches!
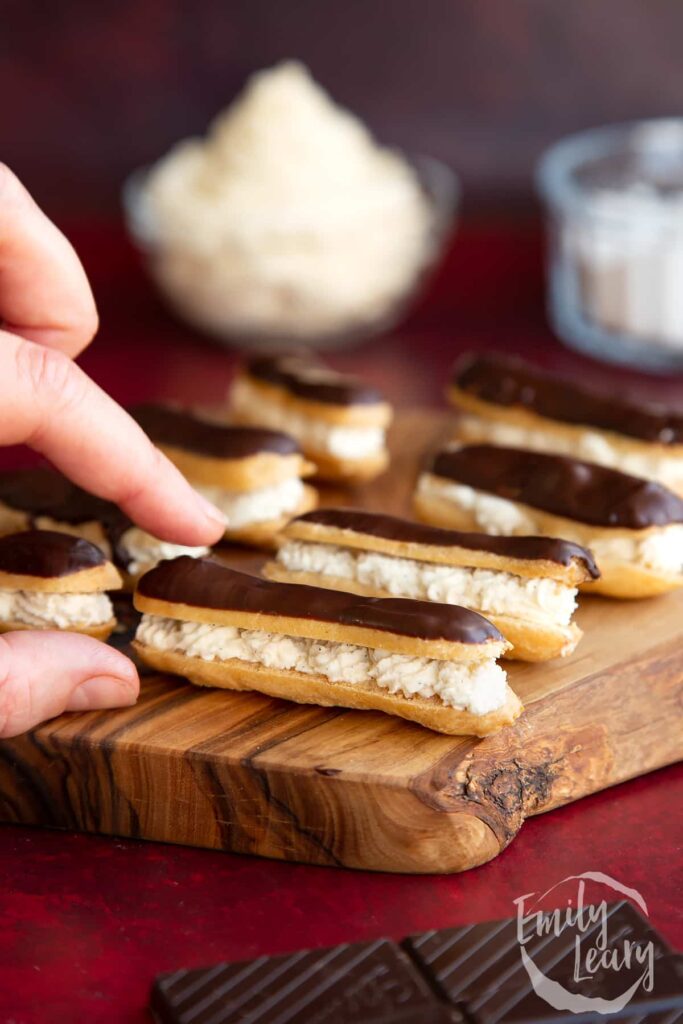
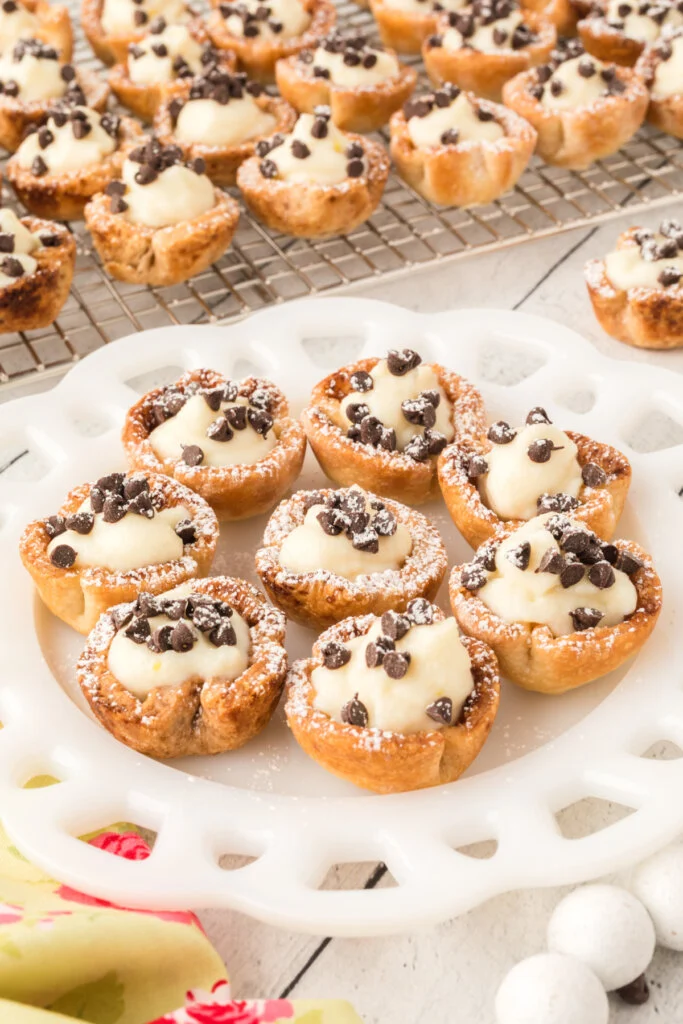
24) Mini Eclairs
Mini eclairs are delightful bite-sized pastries filled with rich cream and coated with chocolate. They are perfect for any occasion, from fancy parties to casual gatherings.
To make mini eclairs, you’ll start with making the choux pastry. Combine water, milk, butter, salt, and sugar in a saucepan. Bring this mixture to a boil. Once boiling, reduce the heat and add flour. Stir vigorously for a couple of minutes until the dough forms a ball.
Remove the dough from heat and let it cool slightly. Preheat your oven to 400 degrees. Line a baking sheet with parchment paper. Add eggs, one at a time, to the cooled dough, stirring well after each addition. The dough should be smooth and glossy.
Transfer the dough to a piping bag fitted with a round tip. Pipe small logs onto the prepared baking sheet. Bake in the oven for about 20-25 minutes until golden brown. Let them cool completely before filling.
For the filling, prepare your pastry cream. Once it’s ready, fill a pastry bag with the cream. Carefully poke a small hole in the bottom of each eclair and fill it with the cream.
Melt chocolate and dip the tops of the filled eclairs. Allow the chocolate to set. Your mini eclairs are now ready to serve! Enjoy these tasty little treats that are sure to impress.
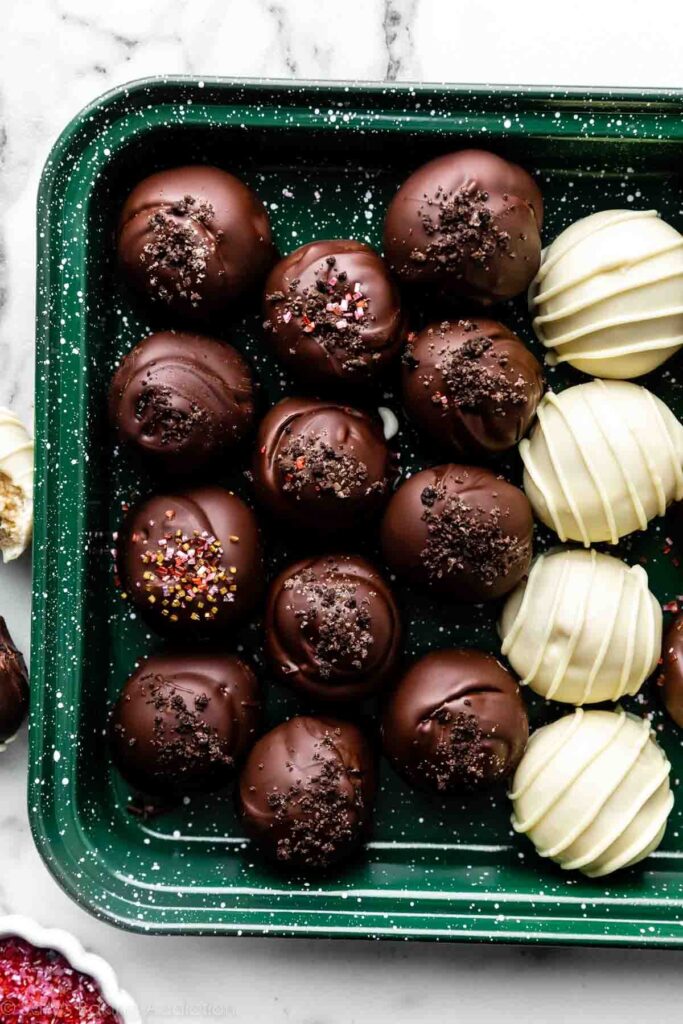
25) Oreo Truffles
Oreo truffles are a simple and tasty treat you can make with just a few ingredients. You only need Oreos, cream cheese, and chocolate. Crush the Oreos into fine crumbs using a blender or food processor.
Mix the crumbs with softened cream cheese until well combined. The mixture should form a thick dough. Shape the dough into small balls, about 1 inch in diameter.
Chill the balls in the freezer for about 30 minutes. This helps them firm up. Once firm, melt chocolate and dip each ball into it. Use forks to coat them evenly.
Let the excess chocolate drip off before placing the truffles on a wax paper-lined baking sheet. You can decorate with sprinkles or extra Oreo crumbs. Allow the chocolate to harden before enjoying. These truffles are a delightful bite-sized dessert for any occasion.
Benefits of Mini Desserts
When compared to traditional-sized desserts, mini desserts offer several unique advantages. They help with portion control, provide an opportunity for variety and creativity, and are perfect for events.
Portion Control
Mini desserts allow you to enjoy a sweet treat without overindulging. With smaller sizes, it’s easier to manage how much you’re eating.
These desserts come in controlled portions, which can help you keep track of your calorie intake. For those watching their diet, mini desserts offer a guilt-free way to enjoy sweets.
Instead of having a large slice of cake, you can have a tiny cheesecake bite or a small mousse cup. This way, you can satisfy your sweet tooth with fewer calories.
Variety and Creativity
Having mini desserts means you can offer a variety of flavors and types in one serving. Instead of choosing just one dessert, you can try several mini versions.
This is a great way to explore new recipes and flavors. You can make miniature pies, cupcakes, and cheesecakes, each with different ingredients and tastes.
Mini desserts also allow for creative presentation. You can decorate them in various ways to make them visually appealing. This can turn a simple dessert into a memorable experience.
Perfect for Events
Mini desserts are ideal for gatherings and celebrations. They are easy to serve, reducing the mess and hassle of cutting and plating larger desserts.
Because they are small, guests can comfortably eat them without needing utensils. This makes them perfect for casual events like picnics and parties.
You can also offer a dessert table with several mini dessert options, allowing guests to choose their favorites. This way, everyone has something they enjoy without feeling obligated to try a large portion.
Tips for Making Mini Desserts
Making mini desserts can be fun and rewarding. Focusing on the right ingredients, presentation, and storage ensures your treats are delicious and beautiful.
Choosing the Right Ingredients
When making mini desserts, the quality of ingredients is key. Fresh, high-quality products improve both taste and appearance. Use fresh fruits, premium chocolate, and real vanilla extract.
Consider these tips:
- Use seasonal fruits for the best flavor.
- Opt for unsalted butter to control the saltiness.
- Choose high-cocoa chocolate for richer taste.
Keep proportions small to match the size of the desserts. Smaller quantities ensure a balanced taste. For example, small doses of a highly concentrated ingredient like vanilla go a long way.
Presentation and Plating
Presentation makes mini desserts more appealing. Choose the right tools and dishes to enhance their look. Small plates, elegant glasses, and decorative paper cups work well.
Focus on:
- Using mini cake stands for height.
- Layering ingredients in transparent glasses.
- Garnishing with fresh herbs or edible flowers.
Decorative elements matter. A sprinkle of powdered sugar or a drizzle of sauce can make a big difference. Arrange them in neat rows or clustered groups for a pleasing effect.
Storage and Shelf Life
Proper storage keeps mini desserts fresh. Understand the specific needs of your ingredients. Most need to be refrigerated, especially those with dairy or fresh fruit.
- Store in airtight containers to maintain moisture.
- Keep some desserts like cookies in cool, dry places.
Always note the shelf life. For example, cream-based items might last 2-3 days, while cookies can last a week. Consider freezing some desserts to extend their shelf life, ensuring they are wrapped well to prevent freezer burn.
By carefully choosing ingredients, presenting them attractively, and storing them properly, you can create impressive mini desserts every time.
Common Mistakes to Avoid
When making mini desserts, small errors can lead to big problems. Here are some common mistakes to avoid to ensure your treats turn out perfect.
Overfilling Molds
Filling molds too much can cause spillage and uneven cooking. It’s best to fill molds only two-thirds full. This leaves space for the batter to expand without overflowing. Overfilling can also result in dense, undercooked centers and burnt edges.
Timely checking during baking helps manage this issue. Clean the sides of molds before baking to prevent burning. Measuring tools like a small ice cream scoop can ensure consistent portions.
Incorrect Baking Times
Mini desserts can cook faster than their full-sized counterparts. Baking for too long or too short a time alters texture and taste. Use a timer to keep track. Overbaked desserts turn hard and dry, while underbaked ones may not set properly.
Check frequently for readiness by inserting a toothpick. If it comes out clean, they’re done. Oven temperatures can vary, so an oven thermometer can provide more accurate readings.
Ignoring Dietary Restrictions
Ignoring dietary restrictions can exclude guests from enjoying your desserts. Some may need gluten-free, nut-free, or dairy-free options. Labeling each dessert helps guests choose what suits their needs.
Substitute ingredients accordingly: almond flour for gluten-free options, or coconut milk for dairy-free treats. Always double-check ingredient lists for allergens. Being inclusive makes everyone feel welcome and safe.


